Deploying a 3-Tier Web App with Docker Compose
This weekend I was working on setting up a 3-tier deployment of an application I've been pretty fond of recently: Ghost. It's a publishing and blogging platform that has some really awesome features. It's fun to mess with in its own right, but if you wanted to deploy Ghost in a production setting you'd want to deploy more than just Ghost in order to do it effectively.
I drafted up a docker-compose.yml file and NGINX configuration to explore this idea and dive into what a production-ready Ghost deployment might work like. Here's a link to the finished product for those who want to dive right in:


3-Tiered Application Architecture Explained
This is a working example of a 3-tier Ghost deployment. There are a ton of great articles and resources on 3-tier architecture so I won’t go into too much detail here as to the ins and outs of the framework. Below is a graph explaining how this application, and others that follow the framework, are organized.
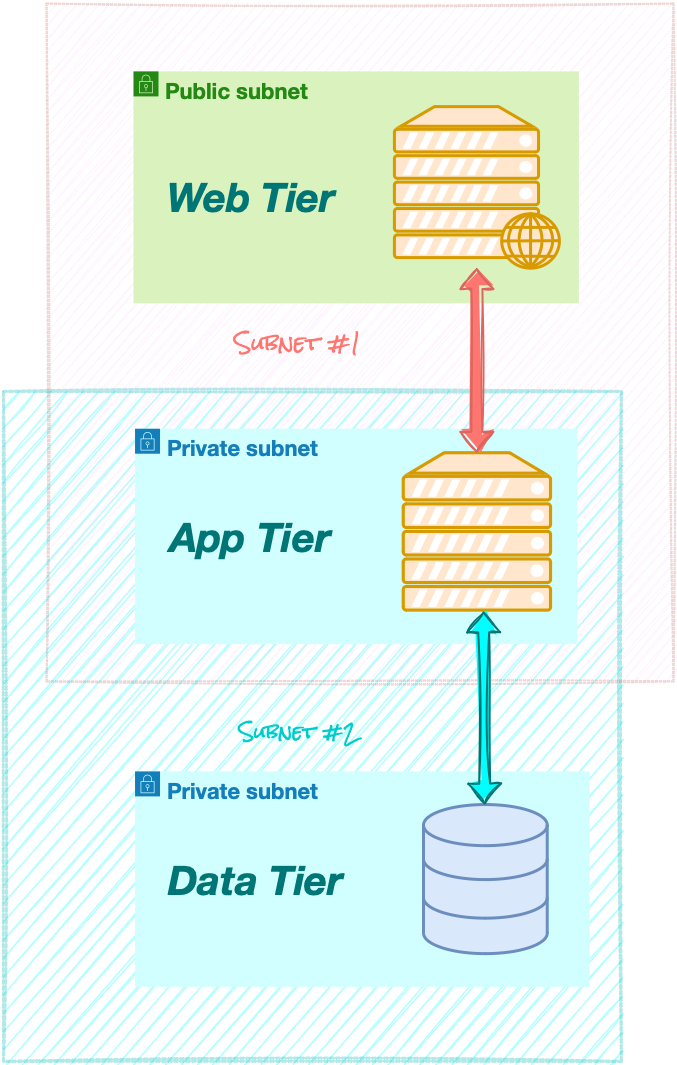
The general idea is to separate the application into 3 parts: a frontend, a backend, and a middle tier that can speak to both the front end and the backend and prevents them from having to talk directly to each other.
Generally, there are a few reasons you might want to do this, but all of the advantages draw from one main fact: by doing this you achieve greater isolation of functional components that comprise your application. Among the benefits are:
- Increased security
- Easier maintenance
- Protection against single points of failure
In a proper 3-tier application, only one of the three tiers is accessible to the end user. This is the part of the application you interface with as you use it and it’s typically accessible via the Internet. This is the presentation layer.
Behind that is the real heart of the application, called the application layer. This is the workhorse of the application and it is usually an API of sorts whose job is just to compute and hand off the resulting work to the presentation layer.
Finally, there’s the data layer. This is the store of data that any application typically needs to run over time. This is where long-term results are stored, and it is referenced by the application layer while it does its heavy lifting.
An Implementation using Ghost
This repository comes in the form of a Docker Compose project. It is composed of 3 Docker containers, each corresponding to one of the tiers in the framework. Ghost, for those unfamiliar, is a blogging platform of sorts for everyone from at-home bloggers to massive publications and enterprise customers. The 3 containers contained in this project are:
NGINX
A reverse proxy whose job is just to interface with the outside world and be a middleman between Ghost and whoever is trying to access its content. Think of it like a currier who delivers pages on demand and goes back and asks the application for pages as people request them.
Ghost
This is the heart of the application. This is the part that generates web content, allows people to make blog posts, organizes all the content in a meaningful way so it can be searched, prevents things from crashing, etc.
MySQL
This is the database where Ghost stores all of its content that’s needed for long-term use. This is a database much like any other, nothing too fancy.
Using the Repository to Deploy Ghost
Below is the docker-compose.yml file that does the heavy lifting of setting up these 3 servers for us:
---
version: '3'
services:
  db:
    image: mysql:8
    expose: [3306, 33060]
    environment:
      MYSQL_DATABASE: ghost
      MYSQL_USER: ghost
      MYSQL_PASSWORD: "$SQL_USER_PASSWORD"
      MYSQL_ROOT_PASSWORD: "$SQL_ROOT_PASSWORD"
    networks: [backend_net]
    volumes: [mysql_data:/var/lib/mysql]
    healthcheck:
      test: ['CMD-SHELL', 'mysqladmin ping', '-h 127.0.0.1', ' --password="$$(cat /run/secrets/db_password)"', '--silent']
      interval: 3s
      retries: 5
      start_period: 30s
    secrets: [ db_password ]
  app:
    image: ghost:5
    depends_on:
      db:
        condition: service_healthy
    environment:
      database__client: mysql
      database__connection__host: db
      database__connection__user: ghost
      database__connection__database: ghost
      database__connection__password: "$SQL_USER_PASSWORD"
      url: http://$NGINX_HOST:$NGINX_PORT
    networks: [backend_net, frontend_net]
  web:
    image: nginx:stable
    ports: [$NGINX_PORT:443]
    volumes: [./nginx/:/etc/nginx/templates]
    networks: [frontend_net]
    depends_on: [app]
    environment:
      NGINX_HOST: $NGINX_HOST
      NGINX_PORT: $NGINX_PORT
    secrets: [ssl_cert,ssl_key,dhparam]
networks:
  frontend_net:
    driver: bridge
  backend_net:
    driver: bridge
volumes:
  mysql_data:
secrets:
  ssl_cert:
    file: ./secrets/nginx.crt
  ssl_key:
    file: ./secrets/nginx.key
  db_password:
    file: ./secrets/db_password
And you’ll have created both a private key and a certificate (you’ll need both files) as well as installed them on your machine so you don’t get that annoying self-signed certificate warning.
Once you’ve done that create a folder called ./secrets wherever you downloaded this repository and place them in there after naming the cert and the key nginx.crt and nginx.key, respectively.
After that, you’ll be ready to use the Makefile to prep the installation. Just type this in the folder with the Makefile and type:
make compose-file
make passwords
After that, you can go ahead and run:
docker-compose up -din the folder where the docker-compose.yml file is generated and it should start booting up the images! At this point, you should be able to navigate in a browser to the domain name you made the certificate out to and see the fresh installation of Ghost. In my example, I was messing around with a domain ziinc.dev.
Although this project is comprised of containers it's designed in a way that allows you to have persistent data beyond the life of any one of the containers. This is achieved by using a Docker volume to hold the database's /var/lib/mysql directory. This is where the data is saved in a MySQL application. The lines below achieve this:
volumes:
  mysql_data:
By structuring the application this way, we can swap any container out with a new one should it go down or get destroyed so long as the Docker volume is managed correctly.
Finally, if you're feeling adventurous, you can easily take this Docker Compose file and use kompose to convert it into a set of Kubernetes entities for a more advanced deployment on Kubernetes. Just download it from here and run the following:
kompose convert -f docker-compose.yaml
kubectl apply -f .
Enjoy!