Creating an Ansible user in Linux
How you manage your Ansible environment is very open-ended. This affords Ansible users an extremely dynamic configuration-management tool. However, this wealth of options can be overwhelming for those new to Ansible or for those that lean heavily on Ansible in small-medium lab environments.
When you’re first starting off you may use Ansible to SSH into your machine’s as root using username and password. This is about as simple of an Ansible access situation as you’ll run into. Why?
- All commonly deployed Linux distributions will provide you with a root user by default.
- In most situations, whether it be forced upon you or you decided it best, the root user will have a password defined.
This is fine if you’re just messing around with Ansible for the first time, but remember the goal of Ansible is to have a control node, a machine that you will use to push configuration changes to all your other machines. So you will be concentrating a massive amount of power (to do good or bad) into a small space. You may just have 1 Ansible user, e.g. named ansible, and 1 control host, e.g. your administrative machine.
If Ansible is set up properly, anyone that has access to this control node will be able to do large amounts of harm to your network because this user is completely designed to be able to go into any machine and make any changes.
The larger your umbrella of devices you manage with Ansible grows, the higher the stakes get with how well you’re protecting this special, often unrestricted access the Ansible control node gets. That being said, the more complex your Ansible environment gets the more you need to think about best practices and how to ensure you’re at least giving some attention to how exposed you are and in what ways; even if just in a lab environment.
Now it’s beyond the scope of this article to explain the details of why, but I’m going to assume you understand the security concerns associated with configuring every machine in your lab to allow root access over SSH using a password. Not only is root access over SSH not advised, but neither is using passwords to authenticate users over SSH. So what’s a better alternative?
Well, we need to dedicate a single, non-root user to make all of our changes via Ansible. This way, we configure auditing and logging on that user in such a way that we simply cannot on the root user. This will give us the ability to go back and see what was done in the event that a bad actor was to gain access to your Ansible control node. Additionally, we may tailor the security requirements of that account exactly as needed for the kind of access and methods of access we expect from our ansible user.
Secondly, passwords are among the weakest forms of authentication. This, like using a non-root user for administrative tasks is beyond the scope of this article, however, suffice it to say SSH key pairs employ asymmetric cryptography that allows the generation and use of credentials that do not have to be sent back and forth while communicating which reduces the possibility of the credential being intercepted, among other things.
So we know we need:
- A user to SSH into our machines as that is not the root user
- A way to authenticate using SSH that relies on asymmetric key pairs and not a password.
For the rest of this article, we’ll be talking about how to configure each one of our hosts that we want to configure using Ansible, either now or in the future, to have this user
- Previously created.
- Granted
sudoaccess. - Only accepting remote SSH authentication via an SSH key pair.
If you want to manage your environment securely using Ansible, but do not have federated access across your home lab that will allow you to create and manage a central Ansible user in your Active Directory environment. This is for those of you who have a medium-sized home lab and want to manage it with Ansible.
If you don’t have the federated access that will allow a single Ansible user you can log in to all your Windows, Linux, etc. boxes with. The simple alternative is to create a separate ansible user with a more or less identical setup across all your machines.
So let's say you have 20 machines in your home lab (virtual, bare metal, or containers). The easiest way to manage them with Ansible is to have all the same Ansible SSH parameters:
- hosts accept the same SSH key pair
- hosts have the same SSH port
- hosts will have the same SSH username
Since creating 20 ansible users across 20 machines would be a slight pain I’ve devised a script below you can tweak and run on any fresh box you spin up that you want to manage with Ansible:
#!/bin/sh

# Create an ansible user that requires no password and
# only accepts SSH authentication. Modify the SSH public
# keys and other variables below to create your ansible
# user as needed.

ANSIBLE_USERNAME="${ANSIBLE_USERNAME:-ansible}"
ANSIBLE_USERID="${ANSIBLE_USERID:-2000}"
ANSIBLE_HOMEDIR_PARENT="${ANSIBLE_HOMEDIR_PARENT:-/home}"
ANSIBLE_SSHKEY=$(cat <<EOF
ssh-ed25519 AAAAC3NzaC1lZDI1NTE5AAAAIAkfocK6qGdfGZLECDB/E5WuOWajWpkoP12JnBrloezb
ssh-ed25519 AAAAC3NzaC1lZDI1NTE5AAAAIFdp/F7yYvsewnZQGbJAGmNcFNbm3qOFCOvrprXDlP24
EOF
)

# 1. Make ansible user

useradd \
  --uid "$ANSIBLE_USERID" \
  --base-dir="$ANSIBLE_HOMEDIR_PARENT"
  --create-home \
  --user-group \
  --system \
  "$ANSIBLE_USERNAME"

# 2. Configure ansible user to have unrestricted, passwordless sudo access

printf '%%%s\tALL=(ALL)\tNOPASSWD:\sALL' "$ANSIBLE_USERNAME" > /etc/sudoers.d/$ANSIBLE_USERNAME

# 3. Configure ansible user's SSH keys to allow incoming connections

mkdir --mode=0700 ~$ANSIBLE_USERNAME/.ssh
chown $ANSIBLE_USERNAME:$ANSIBLE_USERNAME -R ~$ANSIBLE_USERNAME/.ssh
printf "%s\n" $ANSIBLE_SSHKEY > ~$ANSIBLE_USERNAME/.ssh/authorized_keys
chmod 0500 ~$ANSIBLE_USERNAME/.ssh/authorized_keys
chown $ANSIBLE_USERNAME:$ANSIBLE_USERNAME -R ~$ANSIBLE_USERNAME/.ssh/authorized_keys
Shifting Left: Simplifying the Process Even Further
Now that the script is written up and it’s been written in such a way that we can tweak the variables at the top to control, for example, the name of the ansible user and the user's UID, we can use it in a handful of creative ways other than running it by hand on every fresh machine you spin up.
If we already know we want the ansible user on every machine we have. We can create a base image that already includes this ansible user. That way, every time we need a new machine spun up the ansible user will already be created!
Now, there are a few ways to do this. Just to spark your imagination I’ll describe two ways, one more involved than the other.
Embedding the Script in a Kickstart File
Below is a very simple ks.cfg file that can be used to fully, or partially automate the installation of Enterprise Linux distros such as Red Hat or Rocky Linux by including all the variables that you are asked for during the walkthrough-style installation of the OS normally. Instead of being asked for your timezone, firewall preferences, root password, etc. You can just point the fresh machine at (a) this file and (b) the DVD or some other repository of all the packages Linux will download during the initial install. Once the installer has the data and the instructions it can install Linux exactly how you requested it.
The advantage of having a kickstart file set up this way with our little Ansible user created in the post-installation script is that this method can be used for bare-metal installs and virtual machines in more or less the same way. In other words, once you get this little script the way you like it it’s both portable and powerful for generating like images.
lang en_US
keyboard --xlayouts='us'
timezone America/New_York --isUtc
rootpw $2b$10$G0m7VBOzrmZKF5t7NVE.EuFdSmcXKX/WZyMZ..M.UgUfly3A.NMLy --iscrypted
reboot
text
cdrom
bootloader --append="rhgb quiet crashkernel=1G-4G:192M,4G-64G:256M,64G-:512M"
zerombr
clearpart --all --initlabel
auth --passalgo=sha512
skipx
firstboot --disable
selinux --enforcing
firewall --enabled
%post

# THE SCRIPT THAT WE WROTE ABOVE CAN BE PLACED HERE IN
# BETWEEN THE "%post" MARKERS TO CREATE THE ANSIBLE USER
# IMMEDIATELY AFTER THE INITIAL OS IS INSTALLED BEFORE FIRST BOOT

%end
Running the Script Manually & Imaging the Machine
Alternatively, if the above method sounds too complicated for getting you up and running in your home lab with Ansible you can always do the following:
- Install a fresh distribution of Linux in whatever way you’re most familiar with. If you’re struggling just hop over to https://www.osboxes.org) and download your favorite distro for your favorite hypervisor, VirtualBox is free ;)
- Download the script above.
- After tweaking the variables including your SSH public keys and, if you’d like, changing the ansible username, make the script executable and run it using the following command:
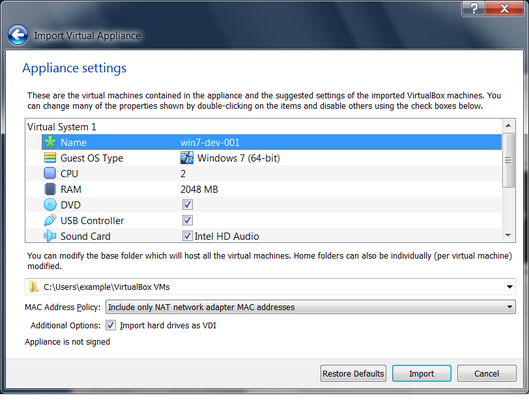
chmod a+x script.sh && ./script.sh - Depending on your hypervisor, these instructions will vary. But you will want to export the virtual machine to OVF format so that it’s just a single file.
Once you’ve exported the VM you should then be able to use that to create your other new VMs either by copying or importing it. As I said above these instructions will vary based on your hypervisor but these links may be illuminating:
Virtualbox